Wednesday, July 27, 2011
Sunburst Mirrors Made with Driftwood
Sunburst Mirrors Made with Driftwood

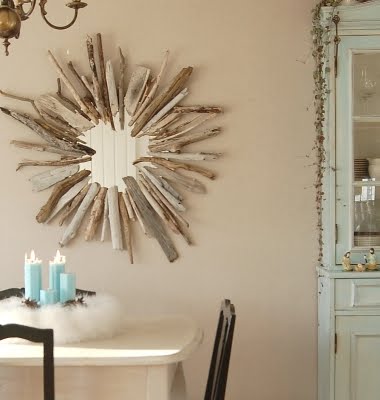
I love the radiating driftwood sunburst mirrors (Sunset)...

... and this is the one I'd like to make (image from a back issue of Better Homes and Garden). I know I sound like a broken record, but the beaches here in RI are not exactly driftwood rich. I can wait..., and hopefully by the time I have my bundle together I also have a step by step tutorial. Perhaps you're going to make this sunburst mirror and share the how to!?
Homemade Sunburst Mirror at White as Linen.

Another way to go. Make a driftwood wreath and hang it over a mirror as seen at Kara Paslay Designs.

Lastly, a glimpse of how to construct Sunburst Mirrors with driftwood (no instructions). It looks like the pieces are glued onto some ring and the mirror goes on last. What do you think -could this be a project for you?
Wood Craft Ideas for Beachcombers -All the Driftwood Sailboats
Wood Craft Ideas for Beachcombers -All the Driftwood Sailboats
One of the best Wood Craft Ideas for sea lovers, without a doubt, are things made from driftwood (see Driftwood Crafts) such as the very popular sailboats. So after posting about Drilling Holes in Driftwood and constructing the boats, here comes the promised line up of all the wonderful sailboats (I could find)! You'll see that for this wood craft idea your driftwood piece doesn't necessarily have to be straight, nor big -it can be itsy-bitsy and fit on a clothespin! And your boat can look complete without sails too. So without further comments..., enjoy the viewing!
Lavender and Linen

The Lettered Cottage

Ocean Soul

Holy Craft

Karnas Hus

It's the Little Things...

Die Froschkoeniging

Cabin on the Water

Emerald Cove

Simple Daisy

Frugal Farmhouse Design

White Flower Farmhouse

Laurie's Projects

Yalos Alanya

Drivtommer Hus

Saturday, July 23, 2011
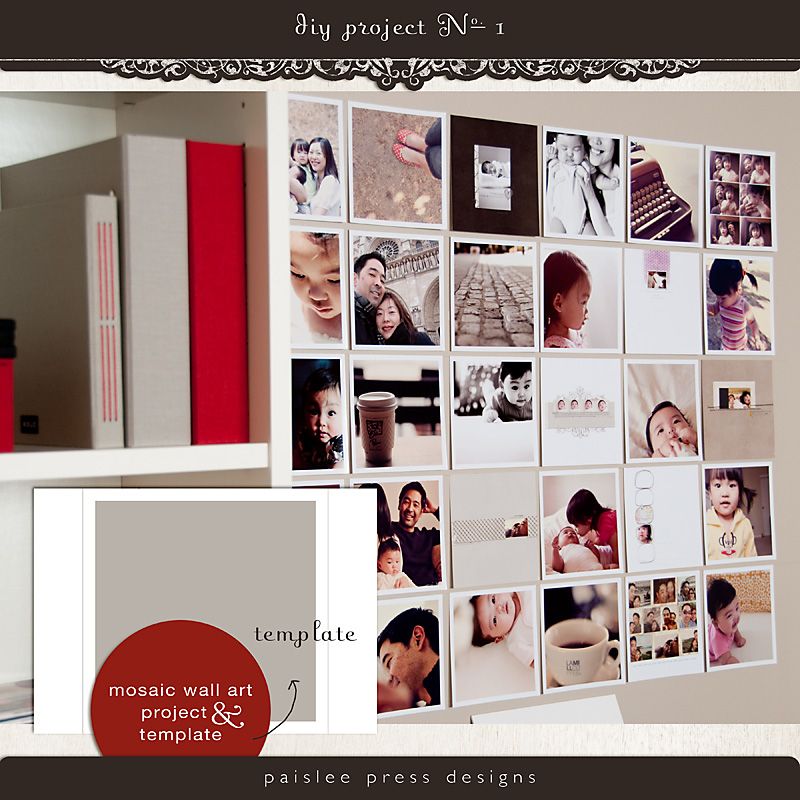
Wall Art - Photos


I got this idea from Domino (oh how I miss that magazine) + Rita Konig’s collection of photos (Oct 2008 issue).
eta – updated with instructions per reader request
 These are the materials I used to assemble the wall display:
1. a leveler (+ pencil)
2. mounting squares*
The first time I assembled the photo wall, I “eyeballed” the positioning and the entire arrangement ended up looking like the leaning tower of pisa. So, I (carefully) peeled off the photos and drew horizontal guide lines on the wall using a leveler and pencil. If you’re really good with eyeballing/guess-timating, then you can feel free to skip this step.
Tip 2: adhering photos to wall
I used double sided mounting squares to stick the photos to the wall. No specific reason for using this adhesive over another except that they were in my stash of craft supplies (left over from my paper scrapping days) and readily available. Place mounting squares along the entire top edge of the photo, then place on the wall.
*update: the double sided mounting squares didn’t work for long. I ended up replacing them with poster strips by 3M – and they are AMAZING.
Chairs
Before and After: Chairs
A few weeks back, I scored two vintage Brown Jordan chairs at the flea market for an unbelievable price. The only problem was that they were an ugly, pea green with vinyl cushions that looked every bit their 40 years. I had been obsessed with this kind of chair after it appeared in nearly every issue of Domino Magazine (Jonathan Adler’s version here) so I decided a little makeover was in order.

{Before}
1. I primed the chairs with two coats of Krylon’s oil-based primer and then spray painted them a glossy white.

2. I went to a lumber yard that custom cut wood to fit the chair seat. My next stop was a foam store where they cut the foam 1/4″ larger than the wood and used a spray glue to adhere the two. I finished the top with batting, that I glued to the foam, so that it would create a clean curve and extend the life of the cushion.

3. I picked out a durable cotton fabric and cut out the shape of the cushion leaving a 4″ border. Once the pattern was centered, I pulled the fabric taut over the edges (starting with the front and back) and stapled it to the frame. I then secured the sides and made sure to overlap the corner pieces perfectly for streamlined edges.

4. Once everything was securely stapled, I trimmed the extra fabric from the bottom.

5. I secured the finished seat cushions onto the chair.

{After}
Silver Leaf Dressers
Silver Leaf Dressers
I love the glam factor that mirrored furniture can bring to a room! My Rhode Island client and I were really hoping to get a little of that glam into her bedroom. Unfortunately, mirrored furniture is really expensive - even the cheapy stuff from Target or Pier 1 was cost prohibitive in this project.When I found this image from House Beautiful, I was inspired to look into getting mirror custom cut to fit a boxy and inexpensive dresser. That also turned out to be completely out of our price range (several hundred dollars for just the mirror for each dresser).

So, we were on to Plan C! I did a little googling and found some images of silver leafed furniture...


We both thought the silver leaf was a good alternative and decided to take the plunge. I found two bombay chests at HomeGoods that were on clearance for $75 because the paint was chipping. The size and shape were perfect for the room.

Once home, each dresser was lightly sanded over the chipped parts and then given a coat of chocolate brown paint (Ralph Lauren's 'Galvenized'). Once the paint had cured, I coated both dressers with 3-hour Quick Set Gilding Size, available here and at most art supply stores. I used about a pint between both dressers.

The gilding size acts as the glue that holds on the leaf. It's applied just like a varnish, and after waiting for a specified time, the size becomes tacky and is ready to be gilded.

There are many types of metal leaf. For this project, I used aluminum leaf because it was the brightest silver tone and looked the most to me like mirror (and the bonus is that aluminum is less expensive than silver leaf). A box of 500 5.5" x 5.5" sheets is $40-$50 and was more than enough for these two dressers.

As far as application of the leaf goes, the basic idea is to carefully lay the sheets down with as little folding of the leaf as possible. Then using a soft bristled paint brush, just tap, burnish and rub the leaf down. It gets really easy with practice - you'll feel like a pro after only 4 or 5 sheets.
Here are my best tips for gilding:
1. Do this project in the garage or outside if you are working on a large scale (like on furniture). The metal leaf bits get EVERYWHERE (which is a bonus if you are a four-year old obsessed with fairy dust)

2. Start with a flat, horizontal surface (like the dresser tops) to get the technique down before you attempt the vertical front or sides.
3. Once you've burnish one leaf sheet and are ready for the next, place that next sheet slightly on top of the already burnished leaf. By overlapping the sheets a little, there will be less of a gap/crack and the resulting look will be more seamless.
4. I ended up sort of liking the cracks and gaps in the gilding (it looks like antique mirror to me, with the chocolate brown base peeping through), but if you don't want to see the "imperfections" just use a bit of extra leaf and rub it into the gap or crack with your finger and the size will quickly pick up the leaf bits.

5. I was shocked at how resilient the gilded surface was after the size had fully dried. My client opted not to seal the finish because she wanted it to gently wear over time, but it would be easy to apply some Wipe On Poly to protect and seal the gilding.
The process looks more intimidating than it really is. While it's sort of time consuming, I was able to catch up on my tivo-ed shows while I gilded (do you spy my remote?).

We used vintage lucite knobs from eBay as a final touch and I think that really moved these formally "Olde World" Homegoods dressers in the "Glam and Gorgeous" category.

Porcelain Pottery
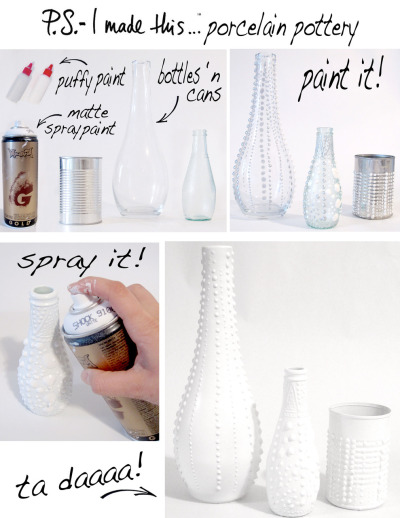
I’m seeing spots! The good kind. Beaded details can be summed up in one word- j’amazing. Recreate and redecorate all at once. I decided to channel this motif into my deep pottery passion/obsession.
Have fun with this simple, design inspired decorative project. Its the perfect way to re-purpose empty cans, bottles, containers without dropping a small fortune on pretty porcelain.
Ceramic Skinny: Check out all the amazing ceramics that hail from West Germany from 1950-1970. The designs are beautiful. Fast forward to our modern-day prince of pottery, Jonathan Adler. Mr. Adler is quirky in all the right ways. His tortoise lamp is currently top on my wish list!
PS- Puffy Paint will totally bring you back to your early art project days!